

Opening Your Swimming Pool
There is nothing more exciting in the swimming pool industry than when spring arrives and the swimming pool can be opened. Of course, those of you in warmer southern climates don’t ever have to close the pool, so you can avoid this part all together. (Lucky you!)
- Remove Your Pool Cover
- Water Chemistry Check
- Just Add Water!
- Check Equipment & Plumbing
- Remove Debris from the Bottom of Swimming Pool
- Start Your Filtration System & Vacuum
- Shock Your Pool
- Stabilize Your Pool Water
- Sanitize Your Pool
- Prevent Algae
- Learn how to Save Time and Money!
Here is a much more detailed description of these steps:
Step 1. Remove Your Pool Cover
If you have a solid winter cover, be sure to drain as much of the water, sitting on top of the cover, as possible before removing it. This is most easily accomplished using a cover pump. Be careful while performing this step; any hole in your pool cover might cause you to
pump out more water than you really need to.
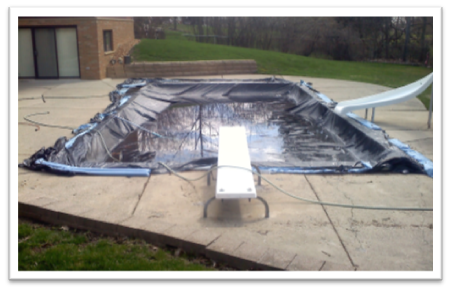
This is a serious issue for fiberglass or gunite pool owners, so please, watch what you are doing! As you might tell your Barber, just a little off the top, please. How serious? See the photo on the right. This is called a pop-out and it’s a major repair.
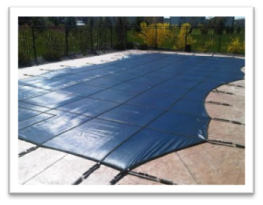
Plastic Covers
Does your pool look like this?
 The pool cover used on this pool is a standard plastic cover with water-bags.
Benefits of using a plastic cover are that it’s a relatively inexpensive way to cover your pool and the cover doesn’t need to be custom fit for coverage.
Water underneath a plastic cover, providing there are no holes in the cover to allow the dirty water through, will allow for clear water underneath when you open it for the spring.
Drawbacks of plastic covers are that they are not the safest option available (think large plastic bag on your pool) causing a potential hazard for animals and children. If you also consider that people want to be as economical as possible, the cover manufacturers have also follow suit. The cover manufacturers have been making plastic covers that last only a season or two because, to make them cheaper, they are making the weave less tight and the materials are not as thick as they could be.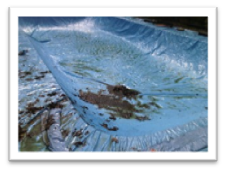
A plastic cover will be good for about 3 years, with great care. You’ll also be purchasing water-bags to go around the edge of the pool. A number of bags will go bad over the winter (holes, tears, and leaks), so you will be investing in new water-bags every year. Some homeowners try to add cinderblocks or patio stones around the pool to anchor the cover. As logical as this sounds to the new pool owner, this is not a good idea. Anything falling into your pool can cause damage to the pool surface (especially a vinyl liner pool) so the money you save by using these anchors might result in a much more expensive repair or even the replacement of your liner. You will still have to pump the water off the cover for the spring opening and need to refill the pool to operational levels for the season.
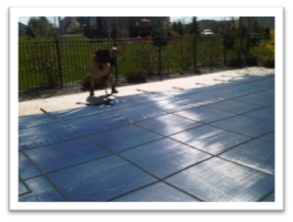
Safety Cover
 Let’s take a look at the opening of a safety covered pool.
The cover is an investment, but the payoffs are huge! The covers are designed to support a person’s weight and may be tempting to trampoline wannabe artists, however using a safety cover that way will wear down the cover at the edge of the pool and might cause a failure when you need it most. As fun as it looks, don’t do it.
One big benefit with a Safety Cover is that rain and melted ice & snow seep through the cover. No water to pump off at opening and the pool is full!
 Using special tools, the crew (say hi to Rick!) will release the springs from the grommets that recess into the patio for summer. (Video Available On-Line) Screw grommets or anchors down so they are flush with your patio before you move the cover so that you don’t catch and snag the cover. Carefully pull the cover off the pool, and take it aside to be cleaned and left to dry, before rolling it up for storage. This can be done by one person, but it’s a lot more fun with two. Note: Although can you put your safety cover on at any time, it is usually considered too cumbersome to take off (and back on) every time you wish to use the pool.
With either type of cover, once you’ve drained the water off and removed the pool cover we recommend using a cover cleaner to remove all dirt and grime from the cover. Make sure your pool cover is completely dry before folding it and storing, it in a dry place, ready for closing up your pool in the fall.
Our opening crew recently opened this vinyl liner pool, and while we could describe it to you, perhaps a photo series is worth even more.
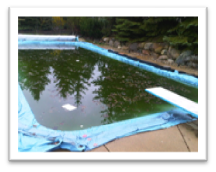
 Wow, this is going to be fun! Notice the swimming pool, plastic cover, water-bags, and leaves buried in the murky water.
The Crew used a large trash pump with 3″ hoses to remove the water from the top of the cover, while scooping leaves off the top.
Progress! We’ve gotten the water and the leaves off the cover, now we can remove the water-bags and carefully pull the cover off the pool.
The cover is off, there is a bit of murky water under the cover, this could be due to small holes in the cover allowing water through. It’s good to get a new cover when this happens.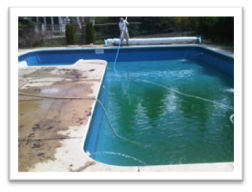
While water is being added to the pool to bring it back up to operational level, the crew vacuums the pool to get fine debris and leaves off the bottom. This helps immensely with water clarity and sets the homeowner up for an enjoyable spring.
 Step 2. Water Chemistry Check

Knowing the chemistry of the water you will add to your swimming pool is essential. The good news is that testing your pool water is easier than ever before! Find a swimming pool water testing method you’re comfortable with, whether it is test strips or a test kit, and record your results. A record will help you to keep track of the chemicals you use and, especially, how much is the right amount for your pool. If more than one person uses your chemicals, this record can save you a lot of aggravation… and money! (Pencil is better than pen, which may run if splashed.)
Step 3. Just Add Water!
Add enough fresh water to bring your swimming pool to the desired height which is typically about ¾ of the way full, in your skimmer. This allows debris to pass into the skimmer and allows enough water to flow through so your system 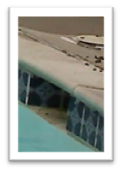 doesn’t get any air infused during full operation. This is too low and the debris can’t get into the skimmer.
Step 4. Check Equipment & Plumbing
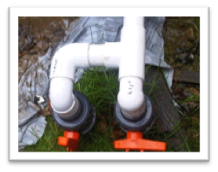 Before you start up your swimming pool pump and filter system, be sure that all lines are open. Make sure the pump and skimmer baskets are in place and free from debris. Remove any “plugs” that may have been put in place to keep water out of the plumbing. Follow your manufacturer’s guidelines for starting up your pool heater, pool filter, and pump. Make sure to start each new season with a clean filter.
The valve on the left is open. The one on the right is closed.
Step 5. Remove Debris from the Bottom
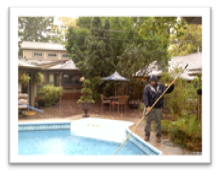 Remove leaves, twigs, and other large debris from the pool’s bottom using a leaf rake. (A pool Leaf Rake has no tines. It’s the bigger skimming net. Do not use a regular rake; you will damage your pool surface.) If you cannot see the pool bottom it is important that you perform this step especially well. The reason for this is that chlorine shock seeks out contaminants to oxidize, including leaves; so much of the chlorine will be consumed if the pool bottom is not well cleaned. A cloudy pool which is free of debris is much easier, and less expensive, to clear up, and shock treatment is more effective.
 Step 6. Start Filtration System & Vacuum

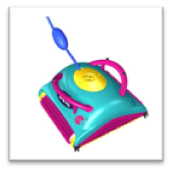
Once your swimming pool is full, you can prime your pump and start the filtration process, while circulating the water. Once the system is up and running, you can hook up your manual vacuum. Skip this step if you have a handy dandy automatic pool cleaner (Note: most automatic cleaners work best in pool water that is over 55 degrees). Brush down the walls to loosen any debris at the waterline, and to allow the chemicals to reach all areas of the pool and do their work.
Step 7. Shock Your Pool
When the swimming pool is free of debris you will want to shock treat the water by adding 1 pound of chlorinated shock treatment, per 10,000 gallons. (Yes, there are just too many good jokes one could insert here.) Follow label directions for the proper way to introduce the shock treatment to your pool. Be careful, especially with a vinyl liner pool, not to just dump granular chlorine into the pool. It can sink to the bottom and, if it sits on the liner for an extended period of time, it can cause bleaching and discoloration of the liner.
Step 8. Stabilize Your Pool Water
 Swimming pool water needs to be stabilized or “conditioned” to prevent the rapid loss of chlorine because of the sun’s UV rays. This will help reduce chlorine usage throughout the season. In other words, save you time and money. Add the recommended amount of stabilizer by dissolving it in a bucket of water before adding it to the pool.
Step 9. Sanitize Your Pool
Now you can begin to sanitize your pool water. Many swimming pools that are being installed these days, are utilizing chlorine generating systems (salt water pools) to chlorinate your swimming pool. So you can have your pool automatically generate the chlorine it needs resulting in a better pool experience. Regardless, when starting your pool for the season, it’s good to give the pool a “shock” treatment and use twice the normal dosage indicated for your pool’s capacity or use an automatic feeder. Allow pool water to circulate overnight for good distribution and filtration.
Step 10. Prevent Algae
Using an algaecide not only kills existing algae but will also prevent algae from entering your pool. Once algae is dead a settling agent can be used to remove it from the pool.
 Step 11. Learn how to Save Time & Money!

Now would be a great time for you to research time and money savers such as salt systems, automatic pool cleaners, and even a weekly maintenance visit from your swimming pool professional. Swimming pool service and maintenance can be quick and easy. Look to your local swimming pool service company for assistance. Many of them offer new user training for the cost of a service call.